Eiledon Briards no longer crops their puppies ears, however this information has been left on our website for those who have cropped puppies to care for.
Although Briards (and their traditional cropped ear) have been around for centuries, the care and maintenance of the cropped ear is still a challenge to us. However, this technique is one that comes from France and is time proven, especially in puppies with correct ear-set and sufficient leather.
In the steps listed below, the puppy’s ears are supported strictly by each other and Tear-Mender Leather and Fabric Glue. Any good quality craft glue that is for porous surfaces, that is flexible when dry, and permanent will do. No water soluble glue as your puppy will get those ears wet no matter what steps you take to avoid that.
Cropped Ear ‘Don’ts’
- Don’t ever put ears up that are not completely dry.
- Don’t put the ears up if there is an open wound on the inner surface of the ear or top of the head.
- Don’t glue the ears to the top of the head.
- Do not use sticks or hard braces such as those used on Doberman Pinschers. If your puppies ears need more support as the grow, you will find techniques at the end of this article to accommodate that.
- Do not take the ears down too early. Generally they should remain glued until all the adult teeth are in– often until the age of one year.
Caring for Cropped Ears
 Sometimes a puppy’s ears are separated due to rough play, or the hair between the ears grows, requiring attention to keep the ears properly supported. You have two choices: try to “fix them” or to start from scratch. Experienced owners may have enough confidence in their mastery of the Art of Ears to fix them, otherwise, take them down and start from scratch.
First, to take them down requires a solvent. Be very careful to keep any solvents out of the puppy’s eyes. I use Goo-Gone, other people use a surgical adhesive solvent. Either is fine, just be careful. Get the glue out with the solvent then thoroughly wash the solvent out with a gentle dog grooming shampoo.
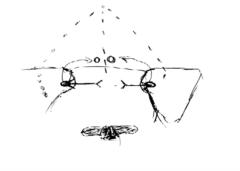
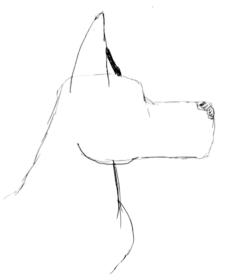
You start with ears down and do a “test drive”. Hold the ears up and together and see where is the first point you can bring the bases of the ears together.
The points indicated in the drawing on the right are the approximate positions that you will dab with glue and hold for a moment to set.
As you work from the bottom up, placing a narrow strip of glue (start with about a 0.25 of an inch at first. You may need to add a little at the base once the ears are up to lend a bit more support) on the inner, backside edge of the ear. Work your way up focusing on keeping the ears centered.
Interim stage looks something like this:
As you work your way up from the base, so long as you keep the ears centered, do not fret if the tips do not line up exactly. Cropping is not an exact science and often one ear is slightly shorter than the other. This is the primary reason to start at the bottom when glueing– so long as you start centered, long term that slight difference in length will be indistinguishable when the Briard has his or her adult coat.
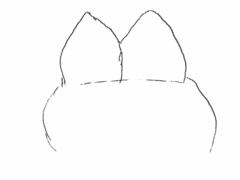
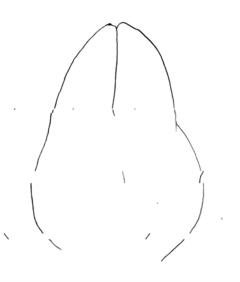
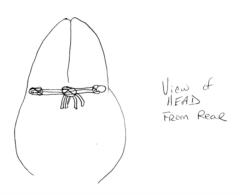
When finished, the front and rear view of the ears should be approximately the same and as illustrated below.
If you determine that the ears are lacking in “forward alertness” or if minor folds develop at the base in the “bell” of the ear, an additional technique can help. Roll-up “test strands” of forehead hair approximately the thickness of several standard wool strands and hold them to a point approximately 1/3 the height of the ear from the base. If the folds go away as you pull the ears forward to attach to the strand, go ahead and apply glue and attach the ears to the strand.
For many puppies, this will be adequate to eliminate any “ear folds”. If not, we add “strings”. Strings are a relatively simple contraption compared to many of the techniques out there. First step is to identify the “bell” of the ear. At the very base you can find the somewhat bulbous cartilage that is at the base of all briard ears on the outer back side of the ear.

The center of the bell is located towards the outside of the ear when viewed from the rear. Simply twine tufts of hair in the relatively same position on the left and right bells and pull gently to test drive if the folds go away or not. Experiment until you find the right start point, then double up some plain cotton string and attach to the rolled strands using your ear glue. They are then tied together with a basic double knot centered on the back of your puppy’s head. The strings both provide tension and support like a sling.

Once the strings are attached, you can largely use that same attachment for long term attachment sites. When either due to head growth or hair growth the string grow loose, they can be either cut to either side of the knot in the center and reattached, or the knot can be carefully twisted and some glue applied to hold it at the desired length. This technique reduces or eliminates the need for any other bracing material such as cork or foam.
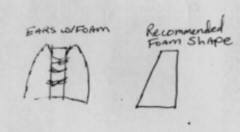
However, you may find that as your puppy’s skull develops it’s more mature breadth that some form of support is required. Semi-stiff crafting foam cut in a truncated triangle can provide adequate support. The foam is centered on the head and a light coat of glue applied to the edges of the foam that face the ears. The ears are then held in place for the glue to set. For added security, cross tufts of hair may be glued across the front edge and back of the foam form. It is not accessory to glue that hair actually to the foam– simply having it secured across the head helps necessary the ears and secure the foam in place.